Sunday, November 13, 2011

Butternut squash soup


I have an ongoing love affair with butternut squash. It's nutty, fragrant, and sweet.

I was a little worried about attempting a blended soup. About a year ago, I tried making a blended tomato and brie soup. Yeah... that was not a successful venture, to put it lightly. I ended up with a funky-smelling tomato sauce.

I was relieved when this soup came together surprisingly easily. It took less than an hour, thanks to some store-bought ingredients. I used Trader Joe's cubed butternut squash and whatever vegetables I had on hand.

I didn't really use a recipe but made up one based on a few recipes I've seen online. I mixed baby carrots, butternut squash, and some potatoes I had on hand.

This soup was soooooo good. It was creamy, even without the addition of cream (I ended up adding just a little, but I don't think it made that much of a difference.) It's very flavorful; the spices are not too noticeable but they serve to bring out the natural flavors of the squash.


saute vegetables in butter and olive oil


add the stock to cover the vegetables and simmer until tender

Blend, and eat!


Butternut Squash Soup

Ingredients:
  • olive oil
  • 1/2 tbsp butter
  • 1/2 an onion, diced
  • 2 lbs of cubed butternut squash, or 2 bags of Trader Joe's pre-cubed butternut squash
  • 2 small potatoes
  • 2 carrots, peeled and diced
  • 1 carton chicken stock
  • cumin
  • curry powder
  • salt, pepper
  • 1/2 cup heavy cream (optional)
Instructions:
  1. Melt the butter and oil in a dutch oven or other large pan. (I used 3 1/2 qt.)
  2. Saute the onions until soft on medium heat. Add the vegetables and saute for about 5 minutes.
  3. Add chicken stock to cover the vegetables. Season with salt, pepper, cumin, curry powder to taste. (You can experiment with others as well... I added a little fresh sage.)
  4. Simmer on low heat, covered, for about 30 minutes, or until the vegetables are fork-tender.
  5. Transfer to a blender or use an immersion blender to puree the soup. Add the heavy cream for extra richness if you desire. Serve!

**Serving suggestions: some people like a little sour cream on top. I like serving it with crostini and some melted parmesan on top.

***This soup also freezes well. I freeze individual servings for later.


Sunday, September 25, 2011

Simple recipes


Have you hosted events and dinner parties? If you have, you know they can be very stressful. If you plan an overambitious menu, you may spend more time than you like in the kitchen.

For dessert, it's best to make something ahead of time. If you simply don't have time or you didn't plan ahead, this dessert is a great last-minute option. It only takes a few minutes to prepare, it's full of flavor, and everyone likes ice cream! The rosemary-infused honey is delightful and fragrant. I'm sure it would go well with a number of dishes if you have extra.


Ice cream with figs and rosemary-infused honey

Ingredients:
  • vanilla ice cream
  • 1/2 cup of honey
  • 2-3 sprigs of rosemary, plus more for garnishing
  • figs
Directions:
In a small saucepan, heat the honey and rosemary on low. Stir over the heat occasionally for 10 minutes. Turn off the heat and let stand for an additional 10 minutes. When it is cool, drizzle over ice cream and halved figs. Garnish with a sprig of rosemary if desired.

Wednesday, July 27, 2011

San Francisco Food Destinations

Whenever my friends visit San Francisco, they always want to EAT. Sure, we do other things too- see the sights, visit museums, check out live music venues, bar hop... but the common thread is food! Perhaps I just take it for granted, but San Francisco is definitely a food destination.

By food-touring San Francisco, not only do you get a chance to eat some good food, but you also can experience the culture of the area. Every neighborhood has its distinctive style and people, so be sure to schedule a wide variety of destinations in your tour. I like to bring people to the tried and true places, but also take advantage of the opportunity to try new places as well.

Some of my favorite food destinations in SF:


Tartine Bakery
Mission/Dolores Park
Tartine is one of those must-visit places. If I were to open a bakery, it would be very similar to Tartine. It is quintessentially French (although the portion sizes seem a bit more American at times-- they are huge!!) Fun fact: their puff pastry for the croissants take about two days to make! There is nearly always a line, but don't let that deter you because the line moves relatively quickly. Everything is executed well and the tables outside are great for people-watching. Or you can grab your food to go and eat at Dolores Park nearby.

Favorite items:
Latte
Banana Cream Tart
Chocolate Croissant
Panini

Smitten Ice Cream
Hayes Valley
I know many will disagree but I favor this place over BiRite Creamery and Humphrey Slocombe. BiRite is a little too mainstream for me and Humphrey Slocombe a little too out-there. Smitten is the happy medium for me. This little pop-up type store doesn't have any seating, but on a nice day it's very pleasant to sit outside on the benches of the park surrounding this place. The ingredients are very fresh and some are quite unique (Chocolate with jalapenos?). Plus, it's so fun to see them make my ice cream to order with liquid nitrogen, so satisfying for the kid in me.

Favorite items:
Vanilla with Cocoa Nib Pralines
Nectarine


Pizzetta 211
Richmond
This is an underrated pizza place in the city. With only a handful of tables inside and two tables outside, the atmosphere is very intimate and adorable. This would be a perfect date place. The pizza is thin crust, just the way I like it. There are traditional pizzas, like tomato basil mozzarella, but the restaurant also branches out into more unusual combinations as well. The menu changes weekly but some items stay the same.

Favorite items:
Farm Egg, Bacon, Corn, Cherry Tomato, Chipotle Creme Fraiche
Rosemary, Fiore Sardo Cheese, Pine Nuts


More to come!

Saturday, July 23, 2011

One Ingredient Berry Ice Cream


Being a single girl in my twenties, I realize I have the luxury of eating whatever I want, no matter how crazy. I don't have a family to cook for, so if I don't feel like cooking a proper meal, I don't have to.

In San Francisco, we've finally been getting the summer promised to us. We've had weather up to mid-70, which is pretty much as good as it gets for SF summers. Finally, I no longer have to curse my iPhone weather app when I wake up every morning...

Today, I decided to try a spin on the "one ingredient ice cream" that has been taking over the blogosphere. Thekitchn made a post about making ice cream by blending frozen bananas. Personally, when I read the post on thekitchn and reddit, I really didn't think much of it. I've been eating frozen bananas since I was a kid precisely because the texture is exactly like ice cream. I've just been too lazy to blend them!

My take on the phenomenon disqualifies it from being "one ingredient." But it's still tasty, easy, and relatively healthy as long as you don't eat tons of bananas. I winged the measurements, but I would say I used two parts bananas to 1 part of each berry. I added just enough liquid to allow my crappy blender to process the solid frozen fruit.


Berry Banana Sorbet

Mix diced frozen banana, blueberries, and strawberries in a blender. (I prepared the frozen banana by myself, frozen berries are from Trader Joe's.) Add a little milk or orange juice. Blend until smooth, serve immediately by itself or with some granola.

A big bowl of berry banana sorbet and some Kashi... perfect summer lunch. Enjoy!

Sunday, May 22, 2011

Review- Little Star Pizza in San Francisco


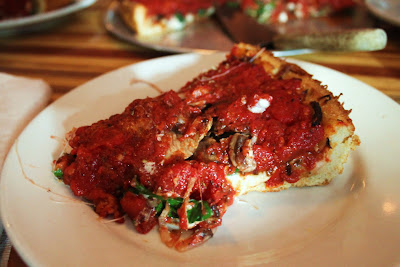
Pizza- it's an iconic American food, but Americans differ wildly in their preferences. Some like New York style thin-crust, some swear by Chicago deep-dish. Usually, I am in the thin-Italian-style camp, so I am wary of any deep-dish pizza. It's hard for me to take deep-dish seriously... it seems more like a lasagna than a pizza, with the toppings often overwhelming any semblance of a crust. I never particularly liked deep-dish, probably because my experience was limited to Pizza Hut and a few other unremarkable varieties.

However, Little Star pizza changed my mind. Little Star is a cute restaurant in the NOPA area of San Francisco which often has a line going out the door. It's fairly common for diners to wait over an hour for a table.
Although the pizza is still loaded with toppings and marinara sauce, the difference is in the execution and the ingredients. The pizza crust is a cornmeal crust which is crispy and hearty. The crust is topped with fresh mozzarella and marinara and toppings like spinach, sausage, and mushrooms. Everything is seasoned perfectly and as far as I'm concerned, it's a delicious, satisfying pie.

Aside from deep-dish pizza, Little Star also has a number of other standouts. There are a few appetizers, including caprese salad, garlic bread, and buffalo wings. The caprese salad was fresh and flavorful. The garlic bread was unique and DIY, with a creamy melty butter sauce to scrape onto your baguette and a clove of roasted garlic. I love roasted garlic; it's so buttery and the roasting gives the garlic a great nutty flavor! Also, Little Star has some thin crust pizzas which are pretty good too.


The atmosphere of Little Star is also fun. Families, couples, and groups all feel comfortable in this busy little restaurant with a small bar. It's not as loud as some of the other restaurants in the area, but it's not the place for an intimate dinner either. There is a jukebox in the corner with remixes like Bee Gees- How Deep is Your Dish?


Overall, I would count Little Star as a must-visit in San Francisco!

Friday, May 6, 2011

A spring dinner- Pork chops and sugar snap peas


I thought I would be very smart this finals period and make a lot of easy to heat comfort foods. I made an abundance of hearty soups, pastas, lasagna. This worked very well for the first week of finals. (No, that's not a typo. I have almost 3 weeks of a final period. Yup... that's law school for you.) However, one thing I didn't count on was the surprisingly gorgeous spring weather this month.

I love spring!! The sunny days slowly grow longer, the air feels fresh, and the mornings feel like a bright new start. Many of my favorite veggies and fruits come into season as well, which makes cooking healthy meals a lot easier.


I recently discovered sugar snap peas. They are basically amazing. If you don't like raw veggies (me) try these, you may be surprised. They have an amazing crunch and a sweet, pleasantly fresh flavor. They are really flavorful compared to other raw veggies like celery and broccoli. I was never one for crudites, but I could eat a bunch of sugar snap peas raw. Sugar snap peas are really cheap right now because they are in season; I got them for 1.50 a pound at the San Francisco Civic Center farmer's market. They are tasty with some dark toasted sesame oil and sesame seeds, or even just plain.

I wanted to try a new recipe that would be a little more adventurous. Yes, I know I'm in the middle of finals. But I need a break once in a while too! And I need a break from my frozen lasagnas. Time for something fresh and spring-like!


I made sugar snap peas with lemon zest, almonds, and mint. I've looked at a few recipes online and I kind of combined a bunch of them into my own recipe. It turned out well. The mint and lemon add zest and freshness... this is the perfect spring dish.

I paired the sugar snap peas with a great Giada recipe. Funny, I've had my Giada cookbook (Giada's Kitchen) for over 2 years, but I've never made anything from the book. I don't think I'm a cookbook type of person. I prefer to think of something I'm craving, look it up online, and make whatever I'm in the mood for. I find cookbooks a little too limited. But I was randomly flipping through the book for some ideas when I discovered this recipe. Pork chops with sweet onion marmellata- doesn't that sound fresh and delicious?

The marmellata took some time and I didn't have orange marmalade so I made some simple substitutions. It turned out great and I absolutely loved it!! It also gave me a chance to use my new Le Creuset dutch oven!! More about that later- I am not ready for a post on it yet, and I'm in no hurry to reveal my beautiful new baby. That will have to wait for another post, when I have time for a proper introduction!


Pork Chops with Sweet Onion Marmellata
Adapted from Giada de Laurentiis recipe here

Onion Marmellata:
· 1/4 cup olive oil
· 4 large onions, sliced into thin strips
· 1/2 cup orange juice
· orange zest from one orange
· 1 tablespoon chopped fresh rosemary
· 1 tablespoon chopped fresh thyme
· 1 teaspoon kosher salt
· 1 teaspoon freshly ground black pepper
· 2 tablespoons balsamic vinegar
· 1 tablespoon sugar (or more to taste)

Pork Chops:
· 1 tablespoon chopped fresh rosemary
· 1 tablespoon chopped fresh thyme
· 2 cloves garlic, minced
· 1 teaspoon kosher salt
· 1 teaspoon freshly ground black pepper
· 4 to pork chops

Directions

For the onion marmellata, place a large, heavy pot over medium-high heat. Add the olive oil and the onions. Stir to combine and cook until starting to sizzle, about 2 minutes. Add the remaining ingredients. Reduce the heat to low. Cover the pot and cook over low heat for 2 hours, stirring every 30 minutes to scrape up any brown bits. The onions should be a soft, jam-like consistency and a deep mahogany color.

Meanwhile, for the pork chops, combine the rosemary, thyme, garlic, salt, and pepper in a small bowl. Using your fingers, work all the ingredients together until well combined. Rub the herb mixture over the pork chops. Cover with plastic wrap and reserve in the refrigerator.

About 20 minutes before the onions are finished, remove the pork chops from the refrigerator. Place a grill pan over medium-high heat or preheat a gas or charcoal grill. Grill the pork chops to medium, about 7 minutes a side depending on thickness. To serve, spoon the onion marmellata over the pork chops. Serve immediately.


Sugar Snap Peas
My own recipe! :) Serves two.

Ingredients
· sugar snap peas (about 2 lb)
· drizzle of olive oil
· 1 lemon
· handful of mint leaves, thinly chopped
· sliced almonds

Directions

1. Peel the ends and the string along the back of the sugar snap peas. (If they are young and fresh, this step may not be necessary.)

2. In a pot of boiling water, cook sugar snap peas for 2-3 minutes, then remove with a slotted spoon and place in a bowl of ice water. After they are cool, drain them.

3. In another bowl, combine chopped mint, lemon juice, olive oil, sugar snap peas. Toss together. After plating the mixture, sprinkle some almonds and lemon zest on top. Serve.


Tuesday, April 19, 2011

Ricotta gnocchi with lemon zest and parsley


I was never a big fan of gnocchi (pronounced nyo-kee). Too many times I tasted gnocchi that was too dense and heavy. I always assumed that it was quite difficult to get right, so I never attempted it at home. Most gnocchi is made with potato, which seemed very challenging. But when I found a recipe for ricotta gnocchi, I thought I could give it a shot. This gnocchi is actually quite traditional too- but it is usually found in the Florence region of Italy.

I promise it is not too difficult. As the main ingredient is ricotta rather than potato, all you have to do is peel open a container of ricotta instead of baking potatoes and scooping them out. I made it for a friend of mine on a weekday night, and we were able to enjoy it in 30 minutes. It was fun making gnocchi for her while she snapped photos. Makes food blogging a whole lot easier!

The ricotta gives it a light, airy texture which makes for the best kind of gnocchi. The outside is perfectly crispy- so addicting! Another reason why I love this recipe is the use of lemon zest- it tastes so vibrant and spring-like. I really try not to exaggerate, but this is the best gnocchi I have ever had. Don't believe me? Try it and find out! :)

Pan-Fried Lemon-Ricotta Gnocchi
Recipe from Jaden's Steamy Kitchen (slightly edited)
serves 2

1 cup whole milk ricotta
1/2 cup parmesan cheese (plus extra for garnishing)
1 large egg yolk
1 teaspoon lemon zest (plus extra for garnishing)
1/2 tsp salt
3/4 cup all purpose flour, sifted
1 tablespoon chopped parsley (plus extra for garnishing)
1 tablespoon olive oil

1. Combine ricotta, parmesan, yolk, zest, parsley, and salt in large bowl. Mix well. Sprinkle half of the flour on the mixture, gently turn with spatula a few times to incorporate. Dump mixture on clean, lightly floured countertop. Sprinkle remaining flour on top of the mixture. Gently knead with your fingertips, just bringing together the mixture until flour is incorporated through. This only should take a minute or two.

2. Divide dough into 4 parts. Take one part and roll into a long, 1" diameter log. Cut gnocchi into 1" pieces.

3. Heat skillet over medium-high heat. Add olive oil. when butter is just lightly browned, add gnocchi in single layer. Fry on one side for 2 minutes, flip. Fry other side for 1-2 minutes. Timing really depends on how big/thick your gnocchi is. Do a taste test - do you taste flour? Not done yet. Serve with a sprinkling of lemon zest, parmesan and parsley.


Sunday, April 17, 2011

Make your own Greek yogurt


Greek yogurt is one of my current favorite foods. Lately, I've been eating it almost every day! Yogurt for breakfast, yogurt for lunch, sometimes as a healthy after-dinner dessert... Unfortunately, this habit is tough on the wallet. Fage yogurt, my indulgence of choice, costs a hefty $2 for a single serving (cheaper at Costco!) Considering the amount of yogurt I eat, I thought it'd be a better option to try my hand at making it on my own.

There are a ton of Greek yogurt tutorials out there. I found the process very easy. Here's how I did it:

Greek Yogurt
Ingredients:
  • two quarts + 2 tbsp of milk (I like 1%)
  • 2 tbsp of plain yogurt
1. Warm 2 quarts of milk over the stove on medium. Bring just to a simmer and turn off immediately when that point is reached.
2. Pour the milk into a large, non-metal bowl. Cool until lukewarm (~100 degrees F). If a skin forms, remove it.
3. Mix 2 tbsp milk with 2 tbsp yogurt. Pour into the lukewarm milk.
4. Cover the milk with saran wrap. Wrap the bowl with a big towel or blanket. Place in a warm spot- the oven with the pilot light on, oven at 100 degrees, a crockpot on very low, or in my case, near my radiator. You want somewhere that will stay at around 100 degrees for at least 8 hours.
5. Check at 8-12 hours to see if it is set. If you pick up some yogurt with a spoon and the yogurt seems gelatinous and the hole stays pretty clearly defined, then it is probably ready. If not, leave for another hour or two.
6. Line a strainer/colander with paper towels. Put the colander over the bowl that will allow liquids to drain. Pour yogurt into the colander on top of the paper towels. Let it drain in the fridge until it is to the consistency you like (maybe 4 hours). If it gets too dry, just add some of the whey (the watery stuff being drained) back out. Whisk to get rid of lumps.


Once the yogurt is done, there are so many options for serving and eating the yogurt. Yogurt dips are great. In the mornings I eat it with a little honey mixed in. You can also use it in place of sour cream, or as a marinade for meat. The options are endless!


Here is one of my favorites. Greek yogurt parfait!

Greek Yogurt Parfait
  • Greek yogurt
  • strawberries
  • banana
  • sliced almonds
In a glass, layer Greek yogurt, strawberries (I microwave-defrost
frozen ones so they are a little syrupy), sliced bananas, and almonds. Serve.

It's decadent but under 300 calories. Truly amazing.


EDIT: I had to add this (unintentionally) funny Fage commercial to this post ;)


"Plain will never be the same."

Tuesday, March 15, 2011

Confession about eggs

Turkey bacon, spinach, tomato, mozzarella scramble

As a child I loved eggs- but I feared mushy scrambled eggs. I hated those scrambled eggs in the metal server trays at breakfast buffets that seem bland, soft, and mushy. That's why I never really ate scrambled eggs for breakfast, opting instead for omelets, poached eggs, or fried eggs. At home, I would sometimes make scrambled eggs, but I would always make them a little golden-brown. This is especially good in Chinese dishes, like eggs with tomatoes, which would be just plain weird to me with soft scrambled eggs.

Then, when I watched a season of Top Chef during college, I realized this was considered quite sacrilegious. Anthony Bourdain would declare a contestant's breakfast dish inedible, because overcooking eggs is "unacceptable." Hmm... was my way of cooking scrambled eggs a foodie faux pas?

Everyone has guilty pleasures in food- food we know should not be cooked a certain way technically, but it tastes good to us. My mom likes her noodles on the softer side, and her steak well-done. Both are things that horrify my food sensibilities. But is there really a right way or a wrong way? If I enjoy it, then does the rest of the world's opinion matter? I've decided to embrace my own way of enjoying food.

Even so, I remain open to new suggestions. I got over my dislike of softer scrambled eggs after stumbling upon a recipe on my friend's fabulous blog, Winner Celebration Party. I followed her recipe to a T (coincidentally, I had all the ingredients on hand.) They turned out soft, fluffy, and delicious. It is a super addictive combination- I have also tried adding some sun-dried tomatoes to the recipe- divine! Props go to WCB to changing my mind about scrambled :)

I will never embrace those buffet eggs, but these have become a weekend staple for me!

Parmesan pesto scrambled eggs- great brunch idea


Parmesan and Pesto Scrambled Eggs

Ingredients:
3 eggs
1/4 cup milk
salt and pepper, to taste
oil
generous sprinkling of parmesan cheese
(Optional: sun-dried tomatoes)
dollop of pesto

Method:
1. In a bowl, combine eggs, milk, salt and pepper. Whisk.
2. Heat some oil in a large pan over medium-low heat. Add eggs, allow to solidify somewhat. Move the eggs around. Add parmesan cheese while still runny, fold. (Can add sun-dried tomatoes at this point if desired.)
3. Plate the eggs and top with pesto. Serve!


Thursday, March 10, 2011

Matcha green tea macarons


I absolutely love green tea. So after learning how to make macarons the right way, I decided to try my hand at green tea macarons. This was not a simple task... matcha green tea powder is somewhat hard to come by, and it tends to be pretty expensive. Nevertheless, I bought a can with my Amazon Prime account (such an enabler for impulse buys).

These turned out really well!! The matcha lends a delicate, herbal flavor to the cookie. There is matcha powder in both the shell and the ganache. The ganache I made with white chocolate, heavy cream, and matcha powder. A little on the sweet side, I think I might prefer a buttercream macaron which may be lighter. Next time!

cross-section! there are air pockets in some.. sigh.


Wednesday, March 9, 2011

Getting your greens


Kale is gaining popularity as an amazing superfood. It has been featured in NY Times countless times. It has antioxidants and vitamins in spades, including vitamin K, vitamin A, vitamin C, and beta carotene. Some people claim it can even help cure cancer. Regardless of the truth of that statement, one thing is clear- kale is good for you. Luckily, it is also quite tasty as well!

For my first time trying kale, I decided to get a bunch at the local farmer's market. I bought a lovely bunch of kale with ruby red stems and veins. I ended up trying two recipes- soup and pasta. They both had essentially the same ingredients and flavor profiles.


First, I made traditional Portugese kale, potato, and sausage soup. This was a hearty, flavorful soup. It's not something I would make on a regular basis though. The kale is very substantial and has a strong, almost spicy taste. However, I found that the soup itself was lacking. Perhaps it was because I used boxed broth and not fresh. You can find the recipe here, i followed it to a T.

Next, I decided to use the same combinations in a penne pasta. This turned out to be really amazing! Kale works really well with sausage- the sausage brings out the spice in the kale. The mushrooms were a great choice as well- the dish was earthy, spicy, and flavorful.


Here's an approximated recipe for the pasta:

Kale, sausage and mushroom pasta

Ingredients:
  • 2 servings of penne pasta
  • 1 shallot, diced
  • 1 handful kale, stems removed and roughly chopped
  • 6 or 7 cremini mushrooms, sliced
  • 2 Italian chicken sausages, casing removed (uncooked preferably)
  • 1 small handful of fresh parmesan cheese
  • red pepper flakes
Method
  1. Cook pasta al dente. While pasta is cooking, heat tsp of oil in a large pan.
  2. When oil is hot, fry the shallots until lightly browned. Add the chicken sausage, stir fry it and crumble the sausage.
  3. When the sausage is brown, add cremini mushrooms and kale. Stir fry for a few more minutes until kale is wilted.
  4. Add pasta to the pan. (I like to add a little pasta water for moisture, but don't overdo this step.)
  5. Season with parmesan cheese and red pepper flakes. Serve hot.

Amazing meal for a cool, sunny Sunday noon


Sunday, February 27, 2011

Macaron class in SF

When the macaron craze started several years ago, I was really into them at first. They are adorable, come in all different sizes, flavors, colors... However, I never really fell in love with the taste of macarons. They are super sweet and a lot of normal flavors don't have enough depth for me. Even when I visited France and ate macarons from everywhere from famed bakery Laduree to the corner grocery shop, I still didn't *love* macarons. When I got an opportunity to eat them, I treasured the little sandwich cookies, but I wasn't really obsessed with them. I could take them or leave them.


My view changed after taking a macaron class last weekend at Bonbini pastry school. Successfully making these little baby macs (with the help of skilled instructor Thip of course :) ) piqued my interest in these macarons all over again. The recipes we made were really well thought out, and I really enjoyed making as well as eating them!

I have made macarons before, but it was nearly impossible for me to achieve consistent results. The class turned out to be a great idea because I learned the Italian meringue method, step-by-step. While the Italian method is a bit more complicated, it is worth it because the results are much more predictable. Every student was able to produce a batch of macarons with feet. We also learned how to make ganache by pairing dark, white, or milk chocolate with different kinds of flavorings. I can't wait to try to make them on my own next time!! :)

dry ingredients

checking the meringue
piping the shells- this is the teacher piping perfectly

piped shells- ready to go in the oven

ooh lala cute little baked shells

finished product (these are the ones I made personally!)

blue cheese, tangerine, rose-raspberry, and chocolate maccies!

The taste was really exquisite. Most were not super sweet which was a plus. I would say my favorites were the rose-raspberry and the blue cheese. The rose-raspberry brought to mind the classic Pierre Herme flavor combination. It was delicate and a little floral without tasting like a perfume. The blue cheese was surprisingly delicious. It was savory, but still retained the dessert quality of a macaron.

Overall, I would highly recommend this class to anyone in the SF bay area. You will learn a lot and best of all, you get a box of your work to take home with you!